Christmas is such an amazing time of year! I absolutely love the run up to Christmas and the chaos (I have two young children), but sometimes it can be tricky to find the time to knit or crochet when life is just super busy.
So, the perfect thing for these busy times is a quick and easy project, and this project is the perfect one for hanging on your Christmas tree.
This is a quick and easy crochet stocking Christmas tree decoration. It uses basic stitches so it’s perfect for beginner crocheters.

Ready to give it a try? Let’s go!
I’ve written the pattern out first in UK terms and then US terms, but don’t worry I explain the pattern in more detail after with photographs to help, so keep on reading!
This pattern uses mainly Single (US terms) / Double (UK terms) crochet stitches and also a few Double (US terms) / Treble (UK terms) crochet stitches, follow the links for tutorials on how to make these stitches. There are also some simple decreasing stitches – single crochet 2 together (US terms) / double crochet 2 together (UK terms).
Quick and Easy Stocking Christmas Tree Decoration
You will need:
- Any colour DK weight yarn (whatever colour you want your stocking to be)
- 4mm crochet hook
- Yarn needle (to weave in the yarn tails at the end)
- scissors
UK terms
Abbreviations:
- ch = chain
- dc = double crochet
- dc2tog = double crochet next two stitches together
- rep = repeat
- sl st = slip stitch
- st(s) = stitch(es)
- tr = treble crochet
PATTERN
Using your yarn and the 4mm hook,
Foundation row: Make 16ch, sl st in 11th ch from hook (this creates the hanging loop), then make 1ch (this does not count as a st), 1dc in the same ch (the same ch you made the sl st into), 1dc in each of next 5 ch, turn. (6 sts and the hanging loop)
Row 1: 1ch (does not count as a st throughout), 1dc in each of next 6 sts, turn.
Repeat Row 1 eight more times.
Row 10: 1ch, miss st at base of ch and miss the next st, 4tr in next st, 1tr in each of next 3 sts, do not turn.
Now rotate your stocking 90 degrees and work around the post of the last st you made and the post of the sts from the rows below:
Next Row: 1ch, 3dc around the treble st you just made, *then 1dc around dc stitch from row below, rep from * two more times, turn. (6 sts)
Next Row: 1ch, 6dc, turn.
Next Row: 1ch, 1dc in first st, dc2tog, 1dc, dc2tog, turn. (4 sts)
Next Row: 1ch, 4dc, turn.
Next Row: 1ch, dc2tog twice, turn. (2 sts)
Next Row: dc2tog, do not turn, continue to the border
Border: Now work dc sts evenly all around the outside edge of your stocking to neaten the sides, when you get to the top hold the hanging loop in front and work behind the loop and then continue on down the sides, sl st in the first st to join.
Cut yarn, fasten off, and weave in all your ends.
US terms
Abbreviations:
- ch = chain
- dc = double crochet
- sc = single crochet
- rep = repeat
- sc2tog = single crochet next two stitches together
- sl st = slip stitch
- st(s) = stitch(es)
PATTERN
Using your yarn and the 4mm hook,
Foundation row: Make 16ch, sl st in 11th ch from hook (this creates the hanging loop), then make 1ch (this does not count as a st), 1sc in the same ch (the same ch you made the sl st into), 1sc in each of next 5 ch, turn. (6 sts and the hanging loop)
Row 1: 1ch (does not count as a st throughout), 1sc in each of next 6 sts, turn.
Repeat Row 1 eight more times.
Row 10: 1ch, miss st at base of ch and miss the next st, 4dc in next st, 1dc in each of next 3 sts, do not turn.
Now rotate your stocking 90 degrees and work around the post of the last st you made and the post of the sts from the rows below:
Next Row: 1ch, 3sc around the double crochet stitch you just made, *then 1sc around the single crochet stitch from row below, rep from * two more times, turn. (6 sts)
Next Row: 1ch, 6sc, turn.
Next Row: 1ch, 1sc in first st, sc2tog, 1sc, sc2tog, turn. (4 sts)
Next Row: 1ch, 4sc, turn.
Next Row: 1ch, sc2tog twice, turn. (2 sts)
Next Row: sc2tog, do not turn, continue to the border
Border: Now work sc sts evenly all around the outside edge of your stocking to neaten the sides, when you get to the top hold the hanging loop in front and work behind the loop and then continue on down the sides, sl st in the first st to join.
Cut yarn, fasten off, and weave in all your ends.
Step by Step instructions:
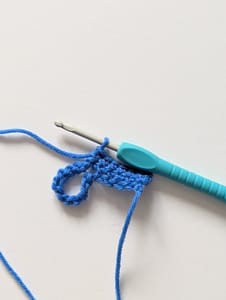
- With your hook and yarn, make a foundation chain of 16 chain stitches.
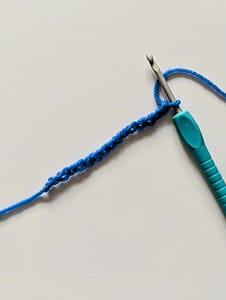
2. Make a slip stitch into the 11th chain from your hook.
3. And then make a single crochet (double crochet in UK terms) into that same chain stitch.
4. Next make a single crochet stitch (double crochet in UK terms) into each of the last 5 chains so you have reached the end of the row.
5. Turn to work the next row, start with a turning chain (this doesn’t count as a stitch here and throughout), and make 6 single crochet stitches (double crochet in UK terms).
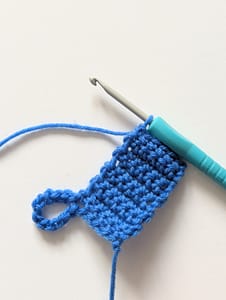
6. Turn and repeat the last row eight more times (this forms the leg of the stocking).
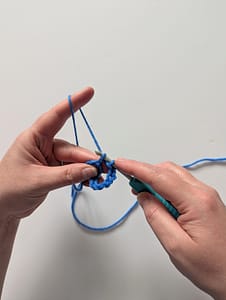
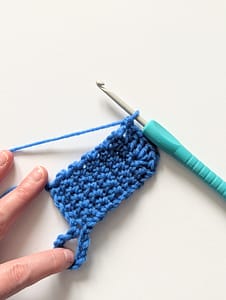
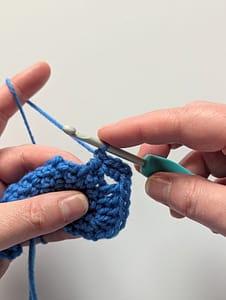
7. Now we’re going to make the Heel, make one chain stitch, miss the stitch at the base of your chain, and miss the next stitch and then make 4 double crochet stitches (treble crochet stitches in UK terms) into the next stitch (the third stitch along).

8. Next work a double crochet stitch (treble crochet in UK terms) into each of the last 3 stitches to the end of the row. Do not turn at the end of this row, but instead rotate the stocking 90 degrees to make the toes of the stocking.
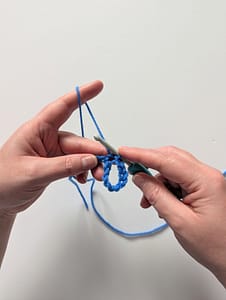
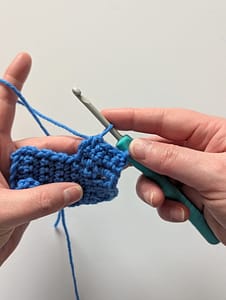
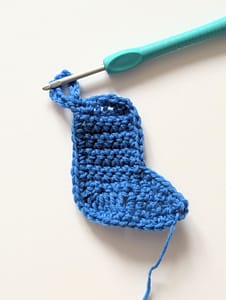
9. Make one chain stitch, again this acts as a turning chain (not a stitch), and make 3 single crochet stitches (double crochet in UK terms) across the post of the last stitch from the last row.
![]()
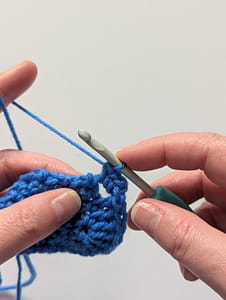
10. Next make a single crochet stitch (double crochet in UK terms) into the stitch from the row below.
11. Make two more stitches, by working into the post of the stitches in the rows below, then turn to work the next row, make a turning chain and make a single crochet (double crochet in UK terms), in each of the 6 stitches you just made.

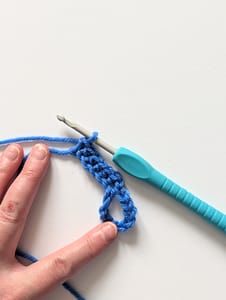
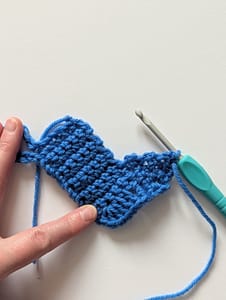
12. Now we’re going to do some shaping for the toes. Start the next row by making a turning chain, make a single crochet (double crochet in UK terms), in the first stitch, and then decrease one stitch by working the next two stitches together with a single crochet 2 together stitch (double crochet 2 together in UK terms), then repeat for the last 3 stitches (one single crochet stitch and one single crochet 2 together stitch), so you now have 4 stitches in total.
13. The next row is going to be a row of straight single crochet stitches, so just simply make 4 single crochet stitches (double crochet in UK terms). We’re then going to continue decreasing stitches by making two single crochet 2 together stitches over the next 4 stitches, so you are then left with 2 stitches. The last row is made by working a single crochet 2 together decrease stitch over the last 2 stitches.
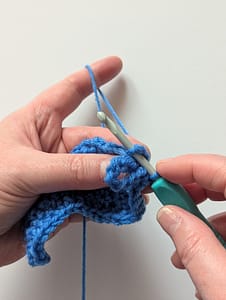
14. Now to neaten the edges of your stocking. This is done by making single crochet stitches (double crochet in UK terms), around the whole outer edge of the stocking, i.e. make single crochet stitches into all the row ends and the stitches as you work your way around the edge. When you get to the hanging loop, just pull the loop in front and work the single crochet stitch behind the loop.
15. And that’s it! All finished! Woohoo!
16. To complete the stocking, cut the yarn and pull through the last loop, use your yarn needle to weave in the yarn ends, and then hang your stocking on the Christmas tree and enjoy!!
Let me know how you get on and what colours you’ve used! I’d love to see!